서론
오류 처리는 어플리케이션 개발에 있어 매우 큰 부분을 차지한다.
오류를 예측하는 것과 예방하는 것, 그리고 오류를 빨리 발견하고 고칠 수 있는 것은 훌륭한 개발자의 필수조건이라고 생각한다.
본 문서에서는 Spring에서 어떻게 예외처리 잘 할 수 있도록 도와주는지를 알아보고 공유하려한다.
ErrorController
먼저 아래 Spring Boot에서 기본적으로 오류처리를 어떻게 해주는지 살펴보자.
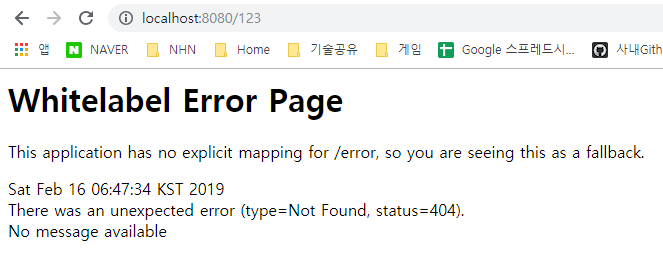
아래는 404 Not Found에 대해서 html, json 응답 예제이다.
GET /123
GET /123 - json 응답
- Content-Type: application/json
1 | { |
위에서 살펴본 것과 같이 별다른 설정 없이 spring boot에서 웹 어플리케이션을 실행하면 기본적으로 오류 처리가 되고 있음을 알 수 있다.
그렇다면 어떠한 설정으로 spring boot에서 오류를 처리하는지 먼저 spring boot의 오류 처리에 대한 properties를 살펴보자.
Spring Boot의 기본 오류 처리 properties
1 | # spring boot의 기본 properties |
server.error.include-exception: 응답에 exception의 내용을 포함할지 여부server.error.include-stacktrace: 응답에 stacktrace 내용을 포함할지 여부server.error.path: 오류 응답을 처리할 핸들러(ErrorController)의 pathserver.error.whitelabel.enabled: 브라우저 요청에 대해 서버 오류시 기본으로 노출할 페이지를 사용할지 여부
server.error.whitelabel.enabled의 기본값이 true이기 때문에 위에서와 같이 오류 페이지가 노출되고 있었다
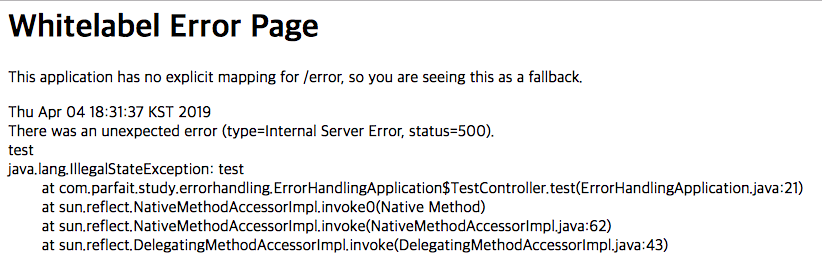
아래 스크린샷은 include-exception과 include-stacktrace를 활성화하면 아래와 같이 응답을 받을 수 있다.
HTML 응답
json 응답
1 | { |
Spring Boot의 기본 오류 처리 - BasicErrorController
그렇다면 Spring Boot에서는 어떻게 이런 기본 처리를 하고 있는 것일까.
Spring Boot는 오류가 발생하면 server.error.path에 설정된 경로에서 요청을 처리하게 한다.
Spring Boot에서는 기본적으로 BasicErrorController가 등록이 되어 해당 요청을 처리하게 된다.
BasicErrorController는 대략적으로 아래와 같이 구현되어 있다.
전반적으로 소스코드를 모두 읽어보면 좋겠지만 주요한 곳에 번호를 붙여 아래에 설명을 달아두었다.
1 |
|
- Spring 환경 내에
server.error.path혹은error.path로 등록된 property의 값을 넣거나, 없는 경우/error를 사용한다. - HTML로 응답을 주는 경우
errorHtml에서 응답을 처리한다. - HTML 외의 응답이 필요한 경우
error에서 처리한다. - 실질적으로 view에 보낼 model을 생성한다
BasicErrorController 정리
BasicErrorController에서는 HTML 요청, 그 외의 요청을 나누어서 처리할 핸들러를 등록하고getErrorAttributes를 통해 응답을 위한 모델을 생성한다.
Spring Boot의 기본 오류 처리 - AbstractErrorController와 ErrorAttributes
getErrorAttributes를 조금 더 깊게 살펴보자.getErrorAttributes는 BasicErrorController의 상위 클래스인 AbstractErrorController에 구현되어 있다.
1 | public abstract class AbstractErrorController implements ErrorController { |
구현된 내용을 보면 ErrorAttributes 인터페이스의 getErrorAttributes를 호출하는 것을 알 수 있다.(위임자 패턴)
별도로 ErrorAttributes를 등록하지 않았다면 Spring Boot는 DefaultErrorAttributes를 사용한다.
아래는 DefaultErrorAttributes의 일부 내용이다.
1 | public interface ErrorAttributes { |
ErrorAttributes에서 가져온 모델로 응답을 생성
1 | { |
확장 포인트 - ErrorAttributes
위에서 살펴봤듯이 ErrorAttributes에서는 오류가 발생했을 때 응답을 내려줄 모델을 생성하고 있다.
여기서 우리는 ErrorAttributes 인터페이스를 마음껏 구현할 수 있다. Spring에서 제공하는 확장 포인트인 것이다.
개발자가 ErrorAttributes를 구현하여 bean으로 등록하면 BasicErrorController는 해당 ErrorAttributes를 사용한다.
아래는 임의로 모델에 "greeting": "Hello"를 추가한 예제이다.
1 |
|
응답 예제
1 | { |
HTML View 연계 - 404.html, 4xx.html
본 문서에서는 View Template Engine으로 Mustache를 사용했다.
이 경우 Spring은 view를 src/main/resources/templates 하위 경로에서 찾는다.(View Template Engine 구현에 따라 다를 수 있다)
이 때 기본 경로 하위에 /error/{응답코드}로 view의 이름을 작성하는 경우ErrorController에서 응답 코드에 맞게 해당 view로 응답을 내려줄 수 있다.
본 문서에서는 HTML view의 접미사(suffix)를
.html로 사용했다
src/main/resources/templates/error/404.html 작성
1 |
|
위와 같이 응답코드로 view 이름을 작성한 경우 404 응답은 위 view로 응답이 처리된다.
더 넓게 4xx.html과 같은 명명으로 400번 대의 응답코드를 모두 처리할 수도 있다.
View를 가져오는 방법 - TemplateAvailabilityProvider
Spring은 어떻게 위와 같은 방식으로 view를 가져왔을까.
이는 TemplateAvailablityProvider로 구현되어 있다.TemplateAvailabilityProvider 인터페이스의 isTemplateAvailable()을 호출하여 view를 resolve할 수 있는지 여부를 파악한다.
현재 프로젝트에 쓰인 Mustache에 대해서는 MustacheTemplateAvailabilityProvider 구현체가 동작한다.
1 | public class MustacheTemplateAvailabilityProvider implements TemplateAvailabilityProvider { |
spring.mustache.prefix의 기본값 “classpath:/templates/“spring.mustache.suffix는.html로 설정- view는
error/{응답코드}가 들어간다
view를 resolve하기 위해
classpath:/templates/error/404.html이 호출된다
확장 포인트 - BasicErrorController
ErrorAttributes와 마찬가지로 ErrorController의 구현체를 개발자가 bean으로 등록한다면
Spring Boot는 해당 빈을 먼저 찾아 BasicErrorController 대신 오류 처리를 위해 사용하게 된다.
위임자 패턴을 사용해서 기본적인 처리는 BasicErrorController에게 위임하고, 나머지 필요한 처리를 추가할 수 있다.
아래 소스에서는 로그를 추가해보았다.
1 | 4j |
spring-webflux에서는?
여태까지는 spring-mvc 모듈을 통해 지원되는 내용이었다.
SpringFramework 5에 추가된 spring-webflux에서도 spring-mvc와의 로직에 대한 대칭성을 유지하는 클래스들이 있다.
| 설명 | spring-mvc | spring-webflux |
|---|---|---|
| 인터페이스 | ErrorController | ErrorWebExceptionHandler extends WebExceptionHandler |
| 편의를 위해 추상화된 클래스 | AbstractErrorController | AbstractErrorWebExceptionHandler |
| 기본 Bean으로 제공되는 클래스 | BasicErrorController | DefaultErrorWebExceptionHandler |
spring-mvc와 마찬가지로 ErrorAttributes를 확장해서 사용할 수 있다.
1 | public class DefaultErrorWebExceptionHandler extends AbstractErrorWebExceptionHandler { |
ErrorController에 대한 추가 설명
ErrorController가 호출되기까지의 흐름을 설명하자면 다음과 같다.
- 서블릿 컨테이너(ex: 톰캣)에서 등록된 서블릿에서 요청을 처리하다가
- 오류가 발생했는데
- 해당 서블릿에서 처리하지 못하고
- 서블릿 컨테이너까지 오류가 전파되었을 때, 서블릿 컨테이너가 오류를 처리하기 위해 특정 경로(
server.error.path)로 해당 요청처리를 위임할 때 사용된다.
spring-mvc Exception 기반으로 오류 처리
앞의 추가 설명에서 봤듯이 ErrorController가 동작하는 것은 요청을 처리해야할 Servlet에서 오류가 발생했으나 해당 Servlet에서 오류를 처리하지 않아서 Servlet Container까지 오류가 전파되었을 때(ServletException으로 래핑된다), Servlet Container가 ErrorController를 호출한다. 이 때, 필자가 테스트한 Servlet Container(Tomcat 9.0.17)에서는 아래와 같은 로그를 남긴다
1 | 2019-04-04 18:31:27.915 ERROR 21947 --- [nio-8080-exec-1] o.a.c.c.C.[.[.[/].[dispatcherServlet] : Servlet.service() for servlet [dispatcherServlet] in context with path [] threw exception [Request processing failed; nested exception is java.lang.IllegalStateException: test] with root cause |
해당 로그는 Servlet Container에서 남기고 있는 것으로, 개발자가 사용자화 하기 어려운 부분이다.
logging framework(log4j, logback) 등으로 해당 로그를 남기지 않거나 할 수는 있지만,
로그 내요을 변경하거나 하기는 어렵다는 것이다.
Spring에서는 Handler(Controller의 @RequestMapping이 걸린 메서드)에서 처리하다 Exception이 발생한 경우, 이를 Servlet Container까지 전파하지 않고, 직접 Exception 별로 처리를 할 수 있도록 해준다. Spring에서 Exception 기반으로 오류를 처리하는 방법을 알아보자.
@ExceptionHandler
Spring에서는 발생한 Exception을 기반으로 오류를 처리할 수 있도록 @ExceptionHandler를 제공한다.
예외를 던지도록 소스 추가
1 |
|
위와 같이 특정 Controller에서 예외가 발생한 경우, Spring은 @ExceptionHandler를 검색하여
해당 애너테이션에 선언된 예외 및 하위 예외에 대해서 특정 메서드가 처리할 수 있도록 한다.
또한 보통의 핸들러와 마찬가지로 @ResponseStatus를 통해 응답 코드를 정의하거나,ModelAndView, String을 반환하여 view를 resolve할 수 있고, ResponseEntity<T>를 반환할 수도 있다.
이제 오류가 발생하도록 요청을 보내보자.
실행
1 | HTTP/1.1 404 |
ControllerAdvice
Spring에서는 Bean으로 등록되는 @Controller들을 선택적으로, 혹은 전역으로 몇가지 공통 설정을 적용할 수 있도록 @ControllerAdvice를 사용할 수 있다
이 @ControllerAdvice에서 사용할 수 있는 것 중 하나가 @ExceptionHandler다
1 | 4j |
ControllerAdvice 나누기
앞의 예제에서는 하나의 method에서 JSON응답과 HTML응답을 해야하는 경우를 나누고 있었다.
HTML view를 사용할 경우와 json view를 사용할 경우를 나누어 ControllerAdivce를 등록하고,@Order를 사용하여 우선 순위를 부여하면 분기처리 없이 나누어 오류 처리를 할 수 있다.
1 | 4j |
Spring MVC에서 제공해주는 ResponseEntityExceptionHandler
ControllerAdvice를 사용하여 Exception 처리를 한 곳으로 모으는 경우, ResponseEntityExceptionHandler를 상속받도록 하여 Spring MVC에서 기본으로 제공되는 Exception들의 처리를 간단하게 등록할 수 있다. 각 Exception 처리를 위한 메서드들은 모두 protected로 선언되어 있으며, 하위 클래스에서 필요에 따라 Override할 수 있다.
1 | public abstract class ResponseEntityExceptionHandler { |
각 Spring MVC Exception 설명
| Exception | 설명 | 응답코드 |
|---|---|---|
| HttpRequestMethodNotSupportedException | 요청 경로는 있으나 지원하지 않는 Method인 경우 발생 | 405 - Method Not Allowed |
| HttpMediaTypeNotSupportedException | 요청의 Content Type을 핸들러가 지원하지 않는 경우 발생 | 415 - Unsupported Media Type |
| HttpMediaTypeNotAcceptableException | 핸들러가 Client가 요청한 Type으로 응답을 내려줄 수 없는 경우 발생 | 406 - Not Acceptable |
| MissingPathVariableException | 핸들러가 URL에서 기대한 Path Variable을 찾지 못한 경우 발생 | 500 - Internal Server Error |
| MissingServletRequestParameterException | 핸들러가 기대한 요청 Parameter를 찾지 못한 경우 발생 | 400 - Bad Request |
| ServletRequestBindingException | 복구 불가능한 치명적인 간주할 binding exception Filter 등의 Servlet Resource에서 던지기 쉽도록 ServletException을 상속하고 있음 |
400 - Bad Request |
| ConversionNotSupportedException | bean property로 요청 내용을 변경하기 위한editor 혹은 converter를 찾지 못한 경우 발생 |
500 - Internal Server Error |
| TypeMismatchException | bean property로 값을 변경할 때, 핸들러가 예상한 class로 변경할 수 없는 경우 발생 | 400 - Bad Request |
| HttpMessageNotReadableException | HttpMessageConverter에서 발생하며 read 메서드가 실패한 경우 발생 |
400 - Bad Request |
| HttpMessageNotWritableException | HttpMessageConverter에서 발생하며 write 메서드가 실패한 경우 발생 |
500 - Internal Server Error |
| MethodArgumentNotValidException | @Valid가 붙은 파라미터에 대해 검증 실패시 발생 |
400 - Bad Request |
| MissingServletRequestPartException | multipart/form-data 요청의 일부가 손실(can’t be found)되었을 때 발생 |
400 - Bad Request |
| NoHandlerFoundException | Dispatcher Servlet에서 핸들러를 찾지 못한 경우 기본적으로 404 응답을 내리지만 Dispatcher Servlet의 throwExceptionIfNoHandlerFound 값이 true인 경우 해당 예외를 발생 |
404 - Not Found |
| AsyncRequestTimeoutException | 비동기 요청의 응답시간이 초과될 때 발생 | 503 - Service Unavailable |
HandlerExceptionResolver
애너테이션 기반으로 동작하는 @ExceptionHandler 외에도 HandlerExceptionResolver 인터페이스를 사용할 수 있다.
이 인터페이스는 요청, 응답, 핸들러, 예외를 받아 ModelAndView를 반환값으로 하는 resolveException 메서드를 가지고 있다.
1 | public interface HandlerExceptionResolver { |
HandlerExceptionResolver 구현체
- ExceptionHandlerExceptionResolver :
@ExceptionHandler가 붙은 메서드를 통해 예외 처리를 할 수 있도록 설정하는 클래스 - SimpleMappingExceptionResolver : 예외 이름과 view 이름을 매핑해주며, browser 요청을 view로 렌더링할 때 유용하게 쓸 수 있다
- ResponseStatusExceptionResolver : Exception 클래스에
@ResponseStatus를 달아 해당 응답 코드로 응답을 보낼 수 있도록 설정하는 클래스 - DefaultHandlerExceptionResolver : Spring MVC Exception에 대해 기본적인 처리를 해주는 클래스
Exception에 응답코드 달기
1 | (HttpStatus.NOT_FOUND) |
위와 같이 Exception에 @ResponseStatus가 붙어 있고, 해당 Exception이 발생하면
Spring에서는 해당 Response Code로 응답을 준다.
이 경우 서비스 로직에서 사용할 Exception이 HTTP라고 하는 MVC 구현에 종속된다.
MVC Layer와 Service Layer의 커플링을 발생시키지 않도록 유의해야 한다.
사용자 정의 HandlerExceptionResolver 구현
번외
Filter와 Interceptor
Filter와 Interceptor는 실행되는 위치가 다르다.
때문에 Exception이 발생했을 때 처리하는 방법도 달라진다.
Interceptor는 DispatcherServlet 내부에서 발생하기 때문에 ControllerAdvice를 적용할 수 있다.
하지만 Filter는 DispatcherServlet 외부에서 발생해서 ErrorController에서 처리해야 한다.
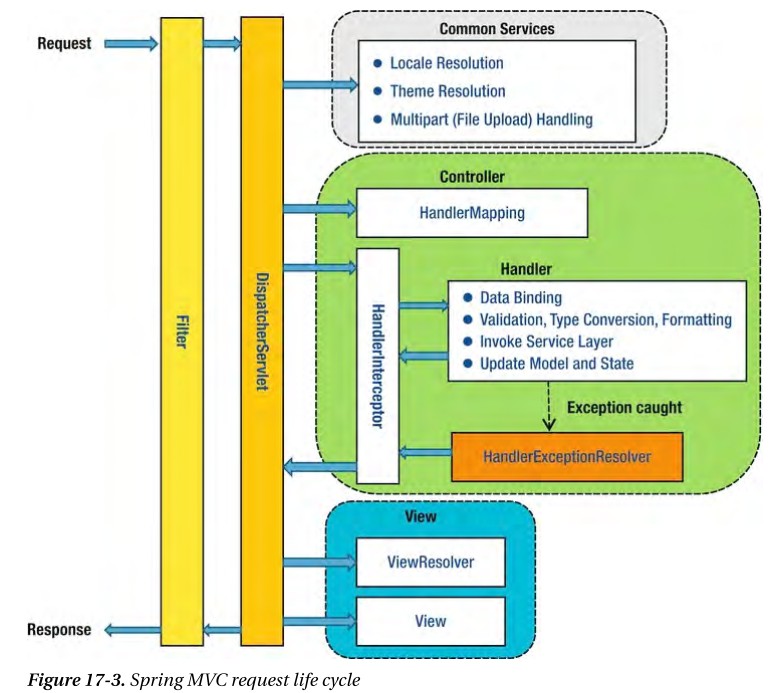
이미지 출처: https://justforchangesake.files.wordpress.com/2014/05/spring-request-lifecycle.jpg
정리
Spring에서 예외처리를 하는 방법에 대해 훑어보았다.
Spring MVC 내에서는 @HandlerException을 통해 각 @Controller별로 예외 처리를 할 수 있었으며,@HandlerException을 @ControllerAdvice에 등록하여 전역적으로 예외를 처리할 수도 있었다.
또한 브라우저 요청과 REST API의 요청을 나누어서 @ControllerAdvice에서 처리할 수 있다.
이러한 기본 동작들은 HandlerExceptionResolver에 의해 이루어진다.
Spring MVC 내에서 처리하지 못한 예외들은 ServletException으로 포장되어 서블릿 컨테이너까지 전파되며, 서블릿 컨테이너는 예외를 처리하기 위해나 경로로 예외 처리를 위임하게 된다. 이때 Spring boot를 기본설정으로 사용하는 경우, BasicErrorController가 이를 담당하게 된다.
마무리
예외 처리에 대해 잘 이해하고, 이를 잘 해내는 것은 견고한 어플리케이션을 작성하기 위한 밑거름이 된다고 생각한다.
경험있는 개발자들은 예외를 미리 예측하고 방지할 수 있다. 하지만 이러한 경험을 잘 쌓기 위해서는 그동안 발생하는 예외에 대해서 파악하기 쉬워야 한다.
예외 처리를 잘 해낸다면 같은 오류가 발생해도 더 빠르게 인지하고, 문제점을 정확하게 짚어낼 수 있을 것이다.
어플리케이션 개발이 운영 국면에 들어서면 기능만 잘 뽑아내는 것보다 예외 탐지, 트러블슈팅, 장애 방지를 잘하는 것이 얼마나 가치있는 것인지 깨닫게 되는 것 같다.
참고
Spring framework reference